It has been a bit since I last blogged - I've been feeling like rubbish and so sewing has taken a back step unfortunately, while I nap on the sofa while zbl has her daytime sleep. We've also had some unseasonably hot weather recently which has meant the sewing and computer area are like a sauna - not the place to be when you're feeling below par!
Anywho, enough blathering on about that, I'll be fine soon enough and Christmas is coming so my list of sewing has increased and I'd better get on to it!
In the mean time, here is the lovely dress I made to go with the fabulous Anna Cape by Big Little.
This is the Sally Dress. (Please excuse the individual pictures, our computer crashed recently (all my bookmarks - gone!) and all the software hasn't yet been installed by the fixer guy - ie tl) On another note - I took these pics a while back, and I swear she's grown another 2 or 3 cm since then!
Sew details:
Pattern: The Sally Dress by Very Shannon - I got this pattern as part of my Sewing Rabbit Pattern Membership - I made up a size 3T without sleeves.
Fabric: A lovely strawberry printed cotton from (surprise, surprise) Spotlight.
Other stuff: This is a lovely pattern to make up. You make up the bodice completely and there is a bit of that fabric origami required to get the shoulder seams to sit nicely, but the instructions are very clear on how to do this. I think the pattern calls for 1.5m of fabric, and I had 1m, so I had to do a little bit of pattern laying origami myself and also reduce some of the bulk out of the skirt, but overall I think it looks lovely and nice and twirly - when zbl works that one out!
Because the bodice is fully lined there are no scratchy bits, which is important and the dress was really very popular and I was allowed to take pictures without having to show them all to the model for approval!!
I am hoping by having made a size 3, we might be able to wear this one for a couple of years, or at least a couple of seasons with layers.
I really enjoyed sewing this up, and have since made another one for a little friend who turned 2 - who also approves!
In other sewing activities - I made up one of these for my Mum, she loves it, altho it is huge (it is a OSFA) but she thinks it is super comfy so doesn't care :-)
So next thing on the list is a pair of hudson pants for myself, that I got through the most recent Pattern Parcel (worth signing up for their emails, as they do have some really good bunches of patterns) and a Christmas dress for zbl using this fabric - yes, amazingly I bought some fabric from somewhere other than Spotlight!
UPDATED next things - I'm participating in Ros's Sweet Pouch Swap - Christmas Edition which is very exciting, and also very nerve wracking - I have so many ideas for what I would like to do, but can I get them done in time, and will my swappie like them - only time will tell!
Showing posts with label Fabric. Show all posts
Monday, 17 November 2014
Monday, 27 October 2014
A Big Little Anna Cape Pattern Review
I was lucky enough recently to get to pattern test the "Anna Cape" for Lisa from Big Little.
zbl has not cottoned onto Frozen yet, but my sister is an Anna by name and nature, so it was lovely to try this out. Also, as it is coming into summer here, having something to cover her shoulders will be great.
Lisa originally made her pattern up with a woolen outer and a lovely cotton lining, but gave us free reign to make it how we wished. Since we are moving into a warmer time of the year, I decided to make a light weight one instead and chose the green based on the fabulous coloured pompom trim I found.
Sew details:
Pattern: The Anna Cape by Big Little - I made up a size 3T.
Fabric: The outer is a lovely cotton lawn, and the lining is a cotton broderie anglaise with strawberries on it :-). The fabric, pompom trim, ribbon on the collar and button for covering came from (surprise, surprise) Spotlight.
Other stuff: This is a super easy pattern to make up. The instructions are so spot on too - the only suggestion I had was to mention when ironing to be careful of the pompom fringe (cos I may have melted the odd bit of mine - whoops!) Lisa recommends a frog clasp for this cape, but since I couldn't find one to match my colour scheme I used a covered button. I used this tutorial to make my covered button, although I didn't have any tools, I just used the back of a marker pen that had a hole in the bottom, and this seemed to work ok.
zbl has not cottoned onto Frozen yet, but my sister is an Anna by name and nature, so it was lovely to try this out. Also, as it is coming into summer here, having something to cover her shoulders will be great.
Lisa originally made her pattern up with a woolen outer and a lovely cotton lining, but gave us free reign to make it how we wished. Since we are moving into a warmer time of the year, I decided to make a light weight one instead and chose the green based on the fabulous coloured pompom trim I found.
Sew details:
Pattern: The Anna Cape by Big Little - I made up a size 3T.
Fabric: The outer is a lovely cotton lawn, and the lining is a cotton broderie anglaise with strawberries on it :-). The fabric, pompom trim, ribbon on the collar and button for covering came from (surprise, surprise) Spotlight.
Other stuff: This is a super easy pattern to make up. The instructions are so spot on too - the only suggestion I had was to mention when ironing to be careful of the pompom fringe (cos I may have melted the odd bit of mine - whoops!) Lisa recommends a frog clasp for this cape, but since I couldn't find one to match my colour scheme I used a covered button. I used this tutorial to make my covered button, although I didn't have any tools, I just used the back of a marker pen that had a hole in the bottom, and this seemed to work ok.
zbl really enjoyed wearing this especially with her new dress - I'll blog about this soon.
Overall a very enjoyable sew, and a great pattern and it has sizes from newborn all the way to 10 (my sister has requested one, so I might have to see what I can do to make it a bit bigger :-)). If you would like to buy this pattern - and you should! Lisa is having a discount until the 31st October 2014 to celebrate the launch. To get this 15% off, enter the code: ANNA15 at the checkout.
Yay!
Location:
Melbourne VIC, Australia
Friday, 24 October 2014
I did it, fist pump! KCW Fall 2014, tick!
So there is quite a lot of self back patting going on here at recently!
I decided I would produce something for Kids Clothing Week Fall 2014, and I actually did it on time and kind of within budget! (I did have to buy some lining fabric and notions).
Obviously in this neck of the woods we're in Spring, but it is still a transitional season, so I'm hoping what I've made thus far will be useful in Autumn too.
KCW this time round has a theme - storybook, which is very cool, but also made me feel kind of ahhhh, how do I still make what I want and have it a bit themey!
Well little did I know this theme would actually be the making of this project!
I have finally started making a list of all the things I want to make and some kinds of deadlines, so I don't completely jump here and there, and then totally miss out on a season or a birthday or the likes.
Anywho, on this list for zbl was a vest, to wear over a couple of layers to keep warm on the way to places in the morning but not to get her all sweaty by the time we get there.
Anyway, long winded explanation for the Huntsmaidan vest. (self styled for this photo shoot with these pants, and her best yellow gummies!)
Inspired by Snow White and the Huntsman (it's a long bow I know, but...)
I decided I would produce something for Kids Clothing Week Fall 2014, and I actually did it on time and kind of within budget! (I did have to buy some lining fabric and notions).
Obviously in this neck of the woods we're in Spring, but it is still a transitional season, so I'm hoping what I've made thus far will be useful in Autumn too.
KCW this time round has a theme - storybook, which is very cool, but also made me feel kind of ahhhh, how do I still make what I want and have it a bit themey!
Well little did I know this theme would actually be the making of this project!
I have finally started making a list of all the things I want to make and some kinds of deadlines, so I don't completely jump here and there, and then totally miss out on a season or a birthday or the likes.
Anywho, on this list for zbl was a vest, to wear over a couple of layers to keep warm on the way to places in the morning but not to get her all sweaty by the time we get there.
Anyway, long winded explanation for the Huntsmaidan vest. (self styled for this photo shoot with these pants, and her best yellow gummies!)
Inspired by Snow White and the Huntsman (it's a long bow I know, but...)
Sew details:
Pattern: This is a mash up of the Reversible Zippy Hoodie and a bit of self drafting (the collar and the welted pockets)
Fabric: This vest is made with corduroy - yes sis, corduroy! with a lovely cotton lining. Both are from trusty Spotlight.
Other stuff: As I said above this is a mash up - the front and back pieces come from the Reversible Zippy Hoodie that I have made before. I drafted the stand up collar based on these pieces and I think it works quite nicely. I also made welted pockets for the first time - whoop, whoop! And look how pretty they turned out - I should admit here that I only photographed the one that was perfect and not the dodgy one with the slightly unmatching welt.
Pattern: This is a mash up of the Reversible Zippy Hoodie and a bit of self drafting (the collar and the welted pockets)
Fabric: This vest is made with corduroy - yes sis, corduroy! with a lovely cotton lining. Both are from trusty Spotlight.
Other stuff: As I said above this is a mash up - the front and back pieces come from the Reversible Zippy Hoodie that I have made before. I drafted the stand up collar based on these pieces and I think it works quite nicely. I also made welted pockets for the first time - whoop, whoop! And look how pretty they turned out - I should admit here that I only photographed the one that was perfect and not the dodgy one with the slightly unmatching welt.
I used this tutorial from the lovely and exceedingly talented Poppy Kettle to learn how to do it, and they seemed to work out just as she described! To make the pockets, I cut out a couple of rectangles of each fabric with the width for the welt and the facing and the facing being a bit longer so to give a deeper pocket. Let's just say these pockets are a hit with zbl marching around the garden with her hands stuffed in them this afternoon. I also found this great looking collection of tutorials on 10 different kinds of pockets which I will use for future projects.
The other thing I did was to pop some buttonhole elastic in the back and make a casing for it to sit in so it gathers at the back a bit. I decided buttonhole elastic as I made it up as a 4T length, in the hope it might last for a while, but gave it some shape so it wasn't too boxy. I popped a couple of buttons inside it and drew it up a bit, and these can be loosened off as she gets bigger. The armholes are probably a bit too big right now, and if I was to make this again, I would reduce these slightly, but overall I am very happy with the result and the model thinks it is ok too!
Anywho, I am so pleased that I got something up for KCW, and even more pleased when I realised this goes for 7 days and not just 5, so I can whip up some slightly speedier, less thinking about things that she also needs, like summer pj's :-) Yay!
I also just realised while editing this post, that it has been a year since I started this blog. I have in that time written 12 posts (shocking), collected no followers or comments (also shocking), but had a lot of fun doing it - and that is the main thing!

Location:
Melbourne VIC, Australia
Monday, 20 October 2014
Still further back in time - a Recess Raglan
So yes, I have been sewing some stuff recently, but some of it is pattern testing which is not quite ready for release yet, and I am actually forcing myself to do a wee bit of self back patting that I did actually do some creative stuff since March!
So we delve further back into the photo archive to the first sewing project I completed in 2014 - in July - shocking!
I eased myself back into sewing with a simple raglan t shirt for zbl.
So we delve further back into the photo archive to the first sewing project I completed in 2014 - in July - shocking!
I eased myself back into sewing with a simple raglan t shirt for zbl.
Sew details:
Pattern: This is the Recess Raglan that I have blogged about before.
Fabric: The star fabric is a knit I got from trusty Spotlight and the white is some lycra from the stash.
Other stuff: This is a very simple sew and because I was using some firmer weight knit and lycra it behaved nicely. The toughest thing about this was appliqueing the star on the front. I ended up popping a bit of the stuff I trace my patterns on to to stabilise it and then cut the excess off, which seemed to work well.
Pattern: This is the Recess Raglan that I have blogged about before.
Fabric: The star fabric is a knit I got from trusty Spotlight and the white is some lycra from the stash.
Other stuff: This is a very simple sew and because I was using some firmer weight knit and lycra it behaved nicely. The toughest thing about this was appliqueing the star on the front. I ended up popping a bit of the stuff I trace my patterns on to to stabilise it and then cut the excess off, which seemed to work well.
I made up a 3T to give room for growth and altho it is a bit big, she quite liked it and we have worn it a few times. It needs to get back into rotation after having to get a bit of extra washing TLC after a run in with something chocolate.
I should say this outfit is self styled, she was already wearing the pants, but added the shoes, beanie and ukulele to make a slightly grunge rocker 2 year old.
Location:
Melbourne VIC, Australia
Sunday, 9 March 2014
Long time no hear!
where the bleep are you? I hear myself asking myself (honestly the internal convos I have!). As I suspected I started this off with a hiss and a roar and then silence.... Sorry about that!
So what have I been up to for the last (refer to last post) 4 months!
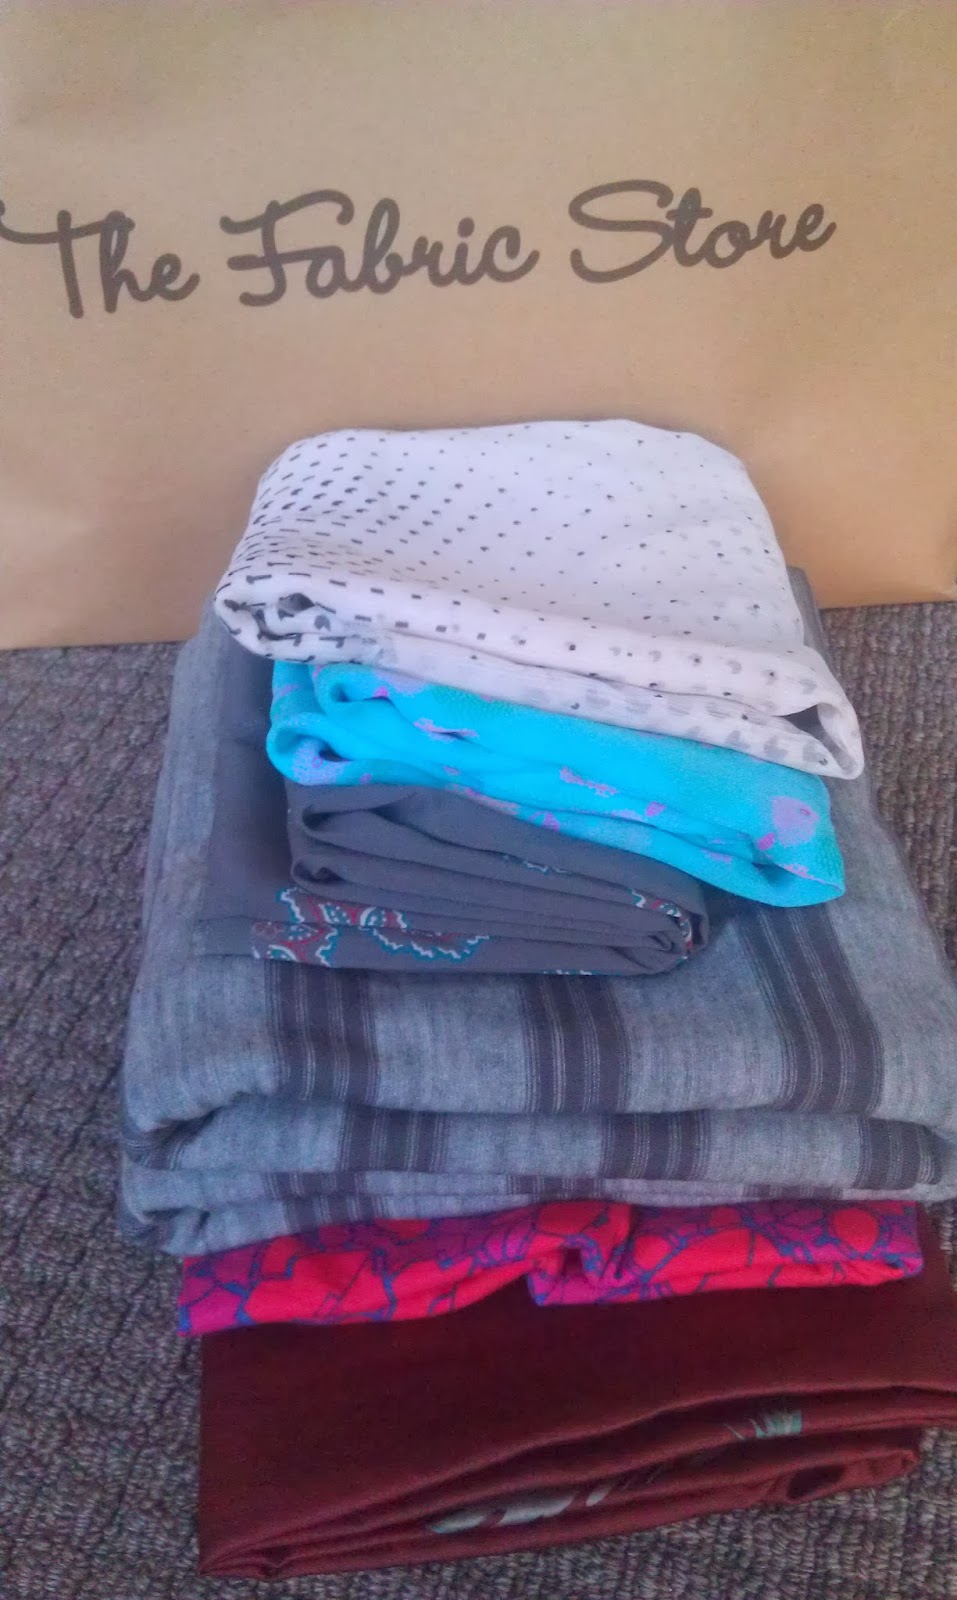
Well lets see, Mum came to visit in November so we went fabric shopping (as you do). We went to the usual (Spotlight), but also trekked over to the fabric store in Brunswick to cash in a percent off voucher I got in my the craft sessions goodie bag. Oh my goodness that place is lovely and dangerous due to the loveliness!
Beautiful silks and merinos and cottons and voile's and lovely things that all wanted to jump in my bag! So indulge I did but not so much that we were on vegemite sandwiches for the rest of the week (phew!)
Here is a pic of the loveliness.
So what do we have in this delicious pile? Starting from the bottom there is a cotton sateen, that I'm thinking a wiksten tank, the next one is a lovely Marc Jacobs cotton lycra that will either be a couple of t-shirts for zbl or a wee dress for her. The stripes is a nice piece of merino that I made into a t-shirt for tl for christmas - I took a pattern from one of his favourite t-shirts. I'm really pleased to say the t-shirt has been worn several times! The next three lovely pieces of fabric are silks, the mushroom one went in a christmas parcel for my sister, the aqua can go into the stash and the white and navy will be made into a top of some sort. I'm looking forward to sewing these things altho I'm a bit nervous about the silks. I shall have to do some research.
So that was November, much thinking, not much doing other than having a fun time hanging out with my Mum :-).
December is always a busy month for me - I have so many ideas, and it is nice when most of them come together, like they seemed to this year!
We had our annual ham fest - any excuse for another ham and pav - yum!
I also made some things too! I made a wiksten tank for my sister using some cotton fabric I bought at Spotlight. It was far easier to cut, iron and sew than the polyester I used for my muslin. Incidentally, Mum liked the muslin version so much I made one for her too, it was still a pain to cut, iron and sew!
The next thing I made and finished at M&D's was this gorgeous wee dress for the daughter of a friend.
Sew details:
Pattern: The Louisa Dress
Fabric: This lovely fabric is a cotton drill from the usual suspect - Spotlight. It was the perfect weight for this dress, it hung nicely and sewed up very easily.
Other stuff: I learnt so many new things in sewing this dress. I did my first invisible zip - which turned out pretty well I think - I'm looking forward to using my invisible zip foot to do the next one; I had to make my own piping as the local fabric store didn't have any (weird!); I also had to install the piping, which I have always avoided as it looked too hard - it is not the easiest thing to do, but the results look great, and the more you do the better it looks - if you were to look at the front pocket you would see that is where I started.
The pattern was very easy to follow and sew up, and Marte has excellent links to all the various tutorials for the different ways of popping in zips etc.
The last little thing I made for Christmas was zbl's christmas day outfit.
Sew details:
Pattern: I made her a wee romper using a pillowcase romper pattern - I can't remember which one tho! I'm sure if you google pillowcase romper and there will be heaps to help you out.
Fabric: a quilting weight cotton with wee gingerbread men on it! It worked really well for the billowing.
Other stuff: this was a very quick sew, cutting out and sewing took less than an hour which is very speedy for me, especially given it required me to do shirring which I had never done before.
I should have popped some snaps on the bottom to make for easy nappy changing, however as this was finished at the last minute, so I just sewed up the bottom, and we undid the straps to get at what we needed to :-)
I should say the photo above was self styled - zbl added her own beads, and I think she might be a wee fashionista in the making - which is exciting, cos she can help me out when she gets bigger :-)
Right, this post is now huge, so I will stop here and post - hopefully the next post will be less than 4 months from now!
So what have I been up to for the last (refer to last post) 4 months!
Well lets see, Mum came to visit in November so we went fabric shopping (as you do). We went to the usual (Spotlight), but also trekked over to the fabric store in Brunswick to cash in a percent off voucher I got in my the craft sessions goodie bag. Oh my goodness that place is lovely and dangerous due to the loveliness!
Beautiful silks and merinos and cottons and voile's and lovely things that all wanted to jump in my bag! So indulge I did but not so much that we were on vegemite sandwiches for the rest of the week (phew!)
Here is a pic of the loveliness.
So what do we have in this delicious pile? Starting from the bottom there is a cotton sateen, that I'm thinking a wiksten tank, the next one is a lovely Marc Jacobs cotton lycra that will either be a couple of t-shirts for zbl or a wee dress for her. The stripes is a nice piece of merino that I made into a t-shirt for tl for christmas - I took a pattern from one of his favourite t-shirts. I'm really pleased to say the t-shirt has been worn several times! The next three lovely pieces of fabric are silks, the mushroom one went in a christmas parcel for my sister, the aqua can go into the stash and the white and navy will be made into a top of some sort. I'm looking forward to sewing these things altho I'm a bit nervous about the silks. I shall have to do some research.
So that was November, much thinking, not much doing other than having a fun time hanging out with my Mum :-).
December is always a busy month for me - I have so many ideas, and it is nice when most of them come together, like they seemed to this year!
We had our annual ham fest - any excuse for another ham and pav - yum!
I also made some things too! I made a wiksten tank for my sister using some cotton fabric I bought at Spotlight. It was far easier to cut, iron and sew than the polyester I used for my muslin. Incidentally, Mum liked the muslin version so much I made one for her too, it was still a pain to cut, iron and sew!
The next thing I made and finished at M&D's was this gorgeous wee dress for the daughter of a friend.
Sew details:
Pattern: The Louisa Dress
Fabric: This lovely fabric is a cotton drill from the usual suspect - Spotlight. It was the perfect weight for this dress, it hung nicely and sewed up very easily.
Other stuff: I learnt so many new things in sewing this dress. I did my first invisible zip - which turned out pretty well I think - I'm looking forward to using my invisible zip foot to do the next one; I had to make my own piping as the local fabric store didn't have any (weird!); I also had to install the piping, which I have always avoided as it looked too hard - it is not the easiest thing to do, but the results look great, and the more you do the better it looks - if you were to look at the front pocket you would see that is where I started.
The pattern was very easy to follow and sew up, and Marte has excellent links to all the various tutorials for the different ways of popping in zips etc.
The last little thing I made for Christmas was zbl's christmas day outfit.
Sew details:
Pattern: I made her a wee romper using a pillowcase romper pattern - I can't remember which one tho! I'm sure if you google pillowcase romper and there will be heaps to help you out.
Fabric: a quilting weight cotton with wee gingerbread men on it! It worked really well for the billowing.
Other stuff: this was a very quick sew, cutting out and sewing took less than an hour which is very speedy for me, especially given it required me to do shirring which I had never done before.
I should have popped some snaps on the bottom to make for easy nappy changing, however as this was finished at the last minute, so I just sewed up the bottom, and we undid the straps to get at what we needed to :-)
I should say the photo above was self styled - zbl added her own beads, and I think she might be a wee fashionista in the making - which is exciting, cos she can help me out when she gets bigger :-)
Right, this post is now huge, so I will stop here and post - hopefully the next post will be less than 4 months from now!
Subscribe to:
Posts (Atom)


.jpg)